Wednesday, January 02, 2019

Know Where You're Sun and Shade Is

Welcome to Part 2 of my garden-planning-for-regular-people series. Planning ahead can really improve your gardening success and winter is the perfect time to start. I will share my experience and insights for planning ahead so you have a successful growing season.

In order for flowers, herbs and vegetables to grow successfully, they need have the right conditions. They is essentially sunlight, water levels, types of soil, health of soil, and climate.

Sunny container with pentas, lobelia.
Sun & Shade
From my perspective, the amount of sunlight hitting your beds daily is the number one factor that will determine your success. My small yard has tremendous variation in sun and shade because of the trees in my yard and in my neighbors yards, and also the trees out along the curb, the house, the shed, the fence and the surrounding buildings. 

For example, this spring I will be moving a little bed of shade-loving hosta that now get almost full sun because of a tree in my neighbor’s yard. The flower beds in the front of the house are almost full-shade now, but they were not that way four years ago then they were installed. This is really bumming me out because I never wanted to be a shade gardener. I love the flowers all summer and fall! Alas, I can still grow them, I just have to change where I grow them in my urban yard. And I am educating myself about growing in the shade.

How to Document Shade and Sun
Six years ago when I first moved to my house, in the early summer I spent a (sunny) day taking photos of the yard every hour to see where the sun and shade landed. I marked a few spots all around the house and every hour or so I took a photo from those same locations. At the end of the day I had a good idea where the sunniest and shadiest locations were and how many hours the sun was hitting sections of the yard. I think I need to do that again this May because of the changes in the height and density of the trees that cast shadow in my yard.

Have Fun with What You Have Available
Shade containers including begonias, creeping jenny
The container garden on the porch step is an example of the extremes in my yard. The cement step is about 10 feet wide and 3 feet deep and this very small space has opposite conditions--one half is full-sun and the other half is full shade. Once I finally figured this out for myself a few years ago, I am excited playing around with what types of plants I put in the containers each year. On the shady side (see photo at left), I usually grow frilly begonias because they need shade and they are so gorgeous to look at when I come in and out of the house.  A few feet away, I fill the pots with sun-loving flowers and herbs (photo above), tying everything together using color.

Set Yourself Up to Succeed
If you are trying to grow plants in the wrong kind of light, they will fail to put it plainly. So be prepared, know where you have the most and least sun and choose plants that will be happy in those conditions.


You can read Part 1 here where I explain all of the places  I find my garden inspiration. 

Monday, December 24, 2018

Winter is for garden dreaming


Poinsettia at the U.S. National Arboretum.

The drab winter is made tolerable for me by garden planning. The possibilities for my little urban yard are endless in January and February! Planning is really valuable because you will be prepared for when the growing season is in full swing. You really can’t make up too much time if you start your seeds too late. I speak from experience, it happens to me every year. But I have gotten better and you can, too!

January and February are all about aspiration. I know you have a mental image of what you think your garden looks like in mid-summer—flowers in bloom, vegetables on the dinner table every night. Hold onto that! With a little planning and organization, we both will get a little closer to the dream in 2019.

My inspiration comes from a lot of places all year long:

  • Botanical gardens and arboretums
  • My neighborhood – if they can grow that, I should be able to
  • Public gardens and parks
  • Garden centers and nurseries
  • Garden and house tours – these usually start up in the spring
  • Seed and plant catalogs
  • Blogs, websites and social sites –I shared a few of  my favorites at the end of this post. Share your favorites in the comments.
  • Books at the library – FREE resource
  • Local garden clubs
  • Gardening events – Coming up in late January/early February is National Seed Swap Day. These events are held all over the country (and worldwide), they are usually free and I have even seen swaps done my mail.

Take notes
I also keep a garden notebook (or journal) and take lots of photos. My notebook is where I take notes when I see a speaker, keep dates of when I have started seeds (indoors or out) and when they started to sprout, what variety of vegetables I planted where so I can keep track of what did well and what did not. I keep notes of seasonal tasks and reminders to move this bush there. It is so helpful with planning because I like to know what plants were successful and, more importantly, what was not so I can address why and try to make conditions better the next time. Growing things is full of failures, but it’s the trying that I focus on.

This is the first in a series about garden planning. So check back, share your experiences and Merry Christmas.
The U.S. National Arboretum is a place of inspiration for me, especially the grounds in the spring, summer and fall. And they do Christmas right! Those hanging poinsettia are glorious.


Social Media Resources
I primarily use Twitter, Instagram and Pinterest for gardening and growing inspiration. I follow gardeners from all over the globe, organizations, publications and retailers. If you have a favorite social site, feed, blog, web site, Facebook group, etc., please share in the comments.

Instagram
Primarily a photo sharing site. Advancingtheplot is my account. You will see the gardeners who I am following there. IG hashtags: #garden #gardendc #flowers #instaflowers #growyourown #gardenchat (there are about a zillion hashtags on Insta).

Twittter
I like Twitter because I can see and share photos and videos, and also very easily follow a link to a web site (not so easy on Instagram). Find me @AdvncingThePlot. Two of the hashtags that I follow on Twitter are #gardendc and #gardenchat.

Pinterest
Another photo sharing site and it’s easy to share additional information. You can set up any number of themed “boards” to collect your “pins” for future reference. Check out my Gardening for Regular People board. I have a few other garden-themed boards that you will see there, too. Based on what you look at, Pinterest will also suggest content.

Friday, December 14, 2018

Composting for Small, Urban Yard


A few years ago at Rooting DC, a fantastic urban agriculture event in Washington, D.C., I was inspired to start composting. My clay soil really needed help and the organic matter that compost added would help with drainage, aeration and tilth (the soil’s ability to grow plants). And I would be helping to decrease waste added to the county landfill. According to “The Maryland Master Gardener Handbook,” municipal waste is comprised of 13% yard waste, 12% food waste and 34% paper, and those are all things that can be composted. What did I have to lose?

I was familiar with composting but was a little intimidated because I thought it was really complicated. My first interaction with serious composting was during my days in the Newark Street Community Garden in northwest D.C. There was a “compost committee” and strict rules for where to put your garden waste, what to put on the pile, and which ripe compost pile to use on your plot. It was a little intimidating! And before seeing those presenters, I felt like I could not have a successful compost pile in my small urban backyard-where would I put it? wouldn’t it attract mice and rats? doesn’t compost smell bad? I had put it off out of fear.

But that day at Rooting DC I decided I was going to try it. Here’s how I did it.

Step 1-Gather your materials
·         Large storage tub with a secure cover. You can buy one at a big box store or try your local thrift store. Also, your town or county may have free or low cost bins available for residents.
·         Drill with LARGE drill bit.
·         Pitch fork.

Step 2-Choose your location
·         Shady spot
·         Near the door so it’s not a pain in the neck to go outside, especially in the winter, to make a deposit
·         Close proximity to where you will be using the finished compost
·         Somewhat out of the way for aesthetics

Step 3-Drill baby, drill!
·         Compost needs air so drill lots of holes on all sides of the bin, including the bottom and the cover.

Step 4-Start composting
·         Start filling the bin with kitchen scraps (green matter) and yard waste (brown matter).
·         Turn the compost weekly.
·         If conditions are dry, you will need to water your compost occasionally to keep it alive.

Step 5-Spread your compost
How do you know it’s “done”? At some point you will have to stop adding scraps to your bin in order to have finished, useable compost. It will be dark in color, smells like fresh earth (mmmm) and the particles are all broken down and unrecognizable. Repeat Step 4.

What to Compost
Kitchen scraps, dead leaves from houseplants, rotten stuff in the produce drawer, dead plants, orange peels, apple cores. Paper egg cartons, plain (uncoated paper), egg shells, coffee grounds and filter, tea bags. You will get the hang of collecting your compost “food” very quickly. There is so much waste every day that can go in the compost bin.

What NOT to Compost
Dairy, bones, fat, salt, pet waste, cooked foods, meat, peanut butter, oil.

Composting is easy, suitable for a small yard, practically free and your garden will see a tremendous benefit. Don’t put if off any longer, no matter what time of year. I am so glad I broke through my fear and you will be, too! Share your experience or ask questions in the comments below.

Composting Resources
EPA


Friday, December 07, 2018

Put your out-of-place pumpkins to good use


Now that Christmas decorations are up in the house and the light extravaganza is plugged in outside, the pumpkins I bought before Halloween seem out of place in my yard. Remember when you were ready for fall? I was so excited back in early October to find the right size, shape and personality of the pumpkins that I was going use to decorate. Alas, pumpkins and Santa do not mix.

There is a Reddit group for photos of squirrels eating things - thanks for the pic!
Put those pumpkins to good use! I smash them open for the birds and squirrels to eat the seeds. Then you can put the orange carcass in the compost bin or, as I do, just leave it out on one of the flower beds to decompose. By spring it will be completely gone and the soil will have some new organic matter to start the growing season.


Saturday, November 24, 2018

Grow herbs on your window sill

Fresh herbs can really boost the flavors in a salad, your favorite soup, fish and chicken...really anything that you prepare. And they have multiple health benefits on top of containing vitamins and minerals. According to Ellie Kreiger's blog, herbs have "plant compounds with potent antioxidant and anti-inflammatory effects. Piles of studies show that polyphenols in herbs help combat such diseases as cancer, heart disease, Alzheimer’s, diabetes and more. Polyphenols are anti-microbial, so they can help protect us from harmful bacteria as well."

Oregano and parsley growing in a sunny window.
But they can be really expensive in the market, particularly when you don't use the whole bunch and it rots in the fridge. I have been growing oregano and parsley in my sunny kitchen window for a couple of years now so I have access to at least two varieties of herbs all year long. Last week we had some really cold weather but I rescued the parsley from the summer vegetable garden and stuck it in a small pot for the kitchen window. I have also seen whole herb plants in the produce section of my grocery store. They are perfect for putting in a pot and growing in your house all winter long.

Tuesday, November 20, 2018

Plant those mums in the spring


One aspect of the fall garden that I have grown to love is chrysanthemums. I say “grown to love” because I could never figure out why you would buy this beautiful plant, enjoy it for a few weeks and then get rid of it. After all, they are easy to find in the big-box and grocery stores starting in late summer and it’s tempting to buy a few plants to dress up the patio. Alas, it’s still pretty hot here in the mid-Atlantic in September so the flowers don’t last long – it either gets dried up really quick or the heat fries the flowers.

But then I discovered that you can plant mums in the ground, and with a little bit of attention over the summer, have beautiful flowers year after year in the cool fall when everything else has been zapped by frost. They bloom for a long time in the cooler weather and the colors say “Autumn.” (Annecdotally I have heard that yellow plants do not live well in the ground.)

Hold on to those mums that you are enjoying this fall. You can plant them in the spring and have beautiful flowers for years to come.

I have collected a few plants over the years and planted them in the spring with great success. Once the flowers have died, cut back the plant to about 3 inches and keep alive over the winter. They do need a little water now and again, but they survive just fine outside on my back steps. Then in a cool spring day, I plant them in the flower beds.

I get them to bloom again in the fall by cutting them back to about 2 ½ to 3 inches right around Independence Day. This allows the plants to continue growing and to form flowers at the right time-when I am wearing a sweater and admiring the fall leaf color- and not in the heat of August.

There are borers that can infest the plants, but I have not had this problem to date.

So if your Thanksgiving guests bring a mum, rejoice because you will enjoy that plant for years to come.

Other Resources for Mums
Chrysanthemum Festival at Longwood Gardens in Pennsylvania runs through November 24, 2018.

Friday, November 02, 2018

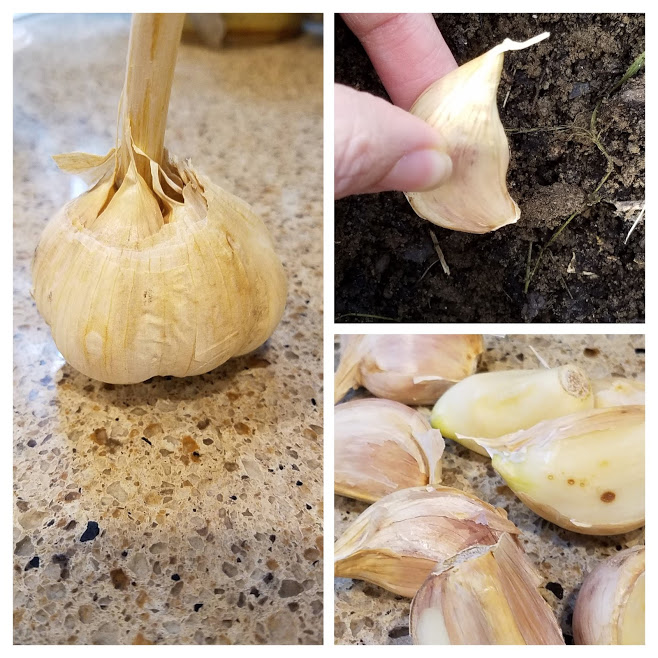
Time to plant garlic

According to the University of Maryland extension, now is the time to plant garlic so roots can develop before the cold winter.


Last week I planted hard-neck garlic that I got at the Silver Spring (Maryland) Garden Club's October meeting. Tony Sarmiento, a local garlic grower and evangelist, shared a head with everyone at the meeting.

  • He advised that your plot get 9 hours of sun a day and be grown in well-drained soil that has organic matter. 
  • Break up the head and plant the individual cloves 6-8 inches apart at a depth double the height of the clove. 
  • It is recommended to dip the cloves in a mixture of 1 part bleach to 9 parts water before planting.
  • He also advised covering the patch with mulch after the ground has frozen.

Easy, right?

I have grown garlic in the past with mixed results so I am eager to see what happens when the winter is over. The garlic will be ready to harvest in early summer.

Saturday, October 20, 2018

Seed Saving Season


It’s fall in the Mid-Atlantic zone 7a, the temperature has dropped about 20 degrees in the past week, and for me this is the time to start saving seeds for my garden next year and for sharing with other gardeners and friends.

What to save
When I grow flowers that I really like, saving the seeds allows me to grow the plants again next year without spending money buying seeds over the winter. One flower I love growing are zinnias. They are really colorful in the yard, come in so many varieties, attract butterflies and make beautiful bouquets throughout the summer and early fall. They are really easy to direct sow in the spring. If you have a sunny spot in your yard, give zinnias a try!
This year I tried four new varieties-Button box, Green Envy, State Fair and Benary’s giant purple.
Clockwise: Green Envy zinnia, Benary's giant purple zinnia, state fair zinnia, marigold 

I keep it simple. Zinnia and marigold seeds are really easy to harvest because the seeds are so large. If you have a flower in your yard that you love, do some research to learn the best way to harvest the seeds for next season. Some flowers have really tiny seeds that take a little more care to harvest, but it’s worth trying if it’s a plant you really like.

How to harvest seeds
In order to harvest flower seeds, you have to let the flower die on the plant. I know, it’s kind of ugly, especially in the middle of the summer then the zinnias and marigold are looking their best, bursting with new flowers. That is why I wait until this time of year, when the plants are starting to get leggy and are starting to die. Let the flowers die on the plant until they are completely dried out and crunchy. It has been really rainy here so I have left the flowers on the plants for them to completely dry out. You don’t want mold growing on the seeds.

Here is a short video I made with the basics of saving zinnia and marigold seeds.


Sometimes the birds will eat the flower petals, see the photos, but I am okay with that. I am happy to be a food source for the goldfinches – they LOVE zinnia flower petals. I see them all summer flitting in and out of the beds.

A warning, though; if you have an unexpected hard frost that kills the plants, your seed-saving will be impacted. This happened to me last year. The flowers were zapped overnight by frost so they did not have a chance to die naturally and develop seeds. This spring I only had a handful of zinnia seeds available.

Storing and sharing
Be careful to mark the seeds you are saving and keep them separated. I have many varieties of zinnias this year. When the flowers are dead, it can be hard to tell what is what. And the seeds all look exactly the same! One year, I left the some trays holding the seeds out on the patio and stiff wind came up and blow they all over the place. Second lesson learned – bring the dead flower pods inside.